Want to make a still photo talk—a portrait that opens its mouth, blinks, and says whatever you type? With VisionStory you can do exactly that from a single image, right in your browser, with no camera and no editing experience. The video above walks through the full flow, and the step-by-step guide below covers every part in detail.
As you go, you will upload one portrait and prepare it as your own reusable avatar. Other users cannot see it, and you can pick it again for future videos instead of uploading the same image every time. Everything runs inside VisionStory's talking photo tool on a free account.
Step 1: Upload one clear portrait
Open AI Video. In the Characters panel, choose Upload and select an image from your device, or drag the photo straight into the drop zone. Use one clear, front-facing person with the face and shoulders visible, eyes and mouth unobstructed, and a little room around the subject for reframing later.
- Supported files: JPG, JPEG, PNG, WebP, and HEIC.
- Maximum file size: 30 MB.
- Recommended starting size: at least 512 x 768 pixels for a portrait.
- Upload behavior: one source image at a time.
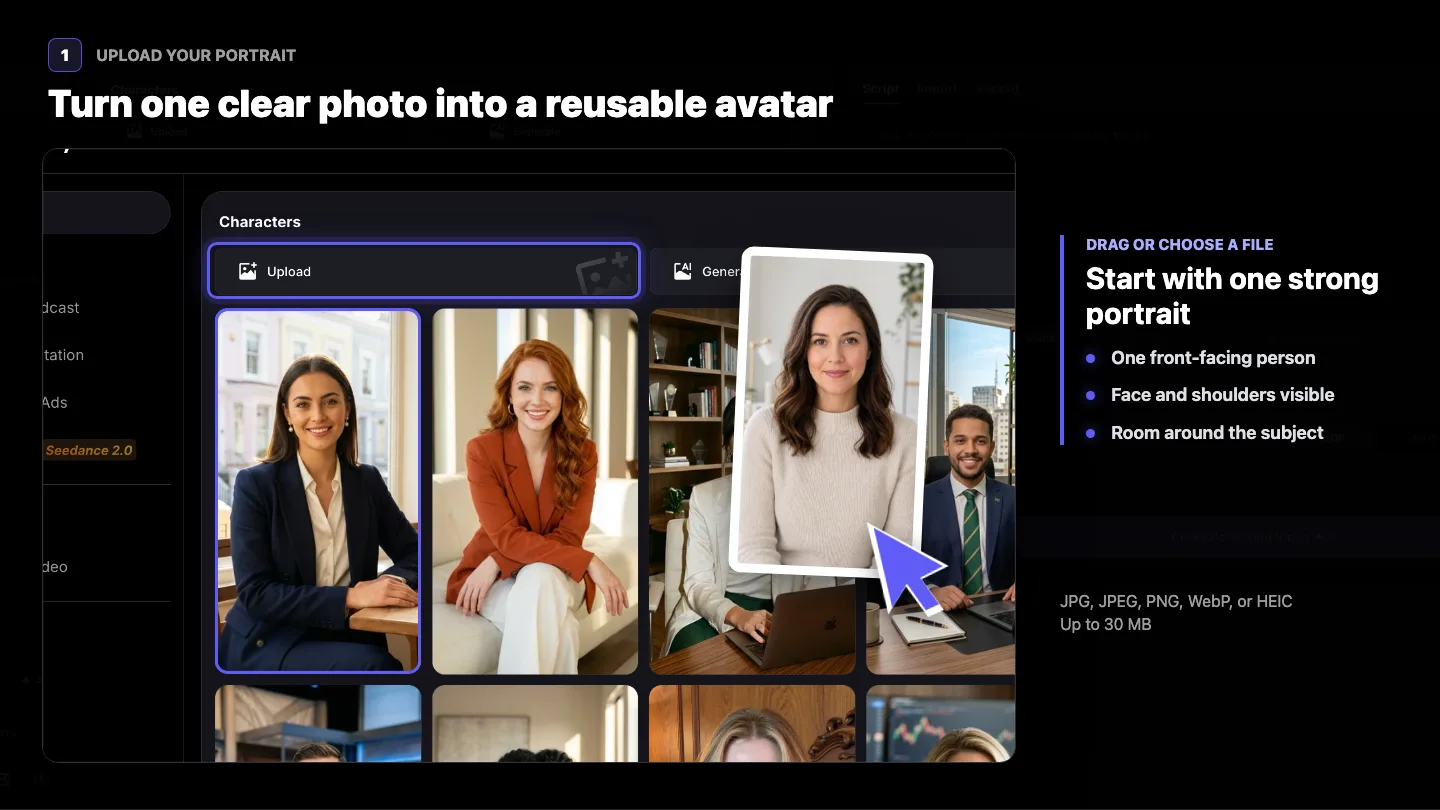
Match the source composition to where the video will end up. A tightly cropped portrait can work in 9:16 but become an uncomfortably tight face crop in 16:9, because there is no image area on the left and right to fill the wider frame.
Step 2: Let VisionStory validate and prepare the avatar
After upload, VisionStory checks whether the image contains a usable person and prepares it as a character. A failed upload almost always points back to the source photo: the face may be too small, heavily covered, turned too far to the side, blurred, or too close to another face.
If preparation fails, do not keep retrying the same crop. Pick a sharper source with one larger face, a more direct angle, visible shoulders, even lighting, and less obstruction.
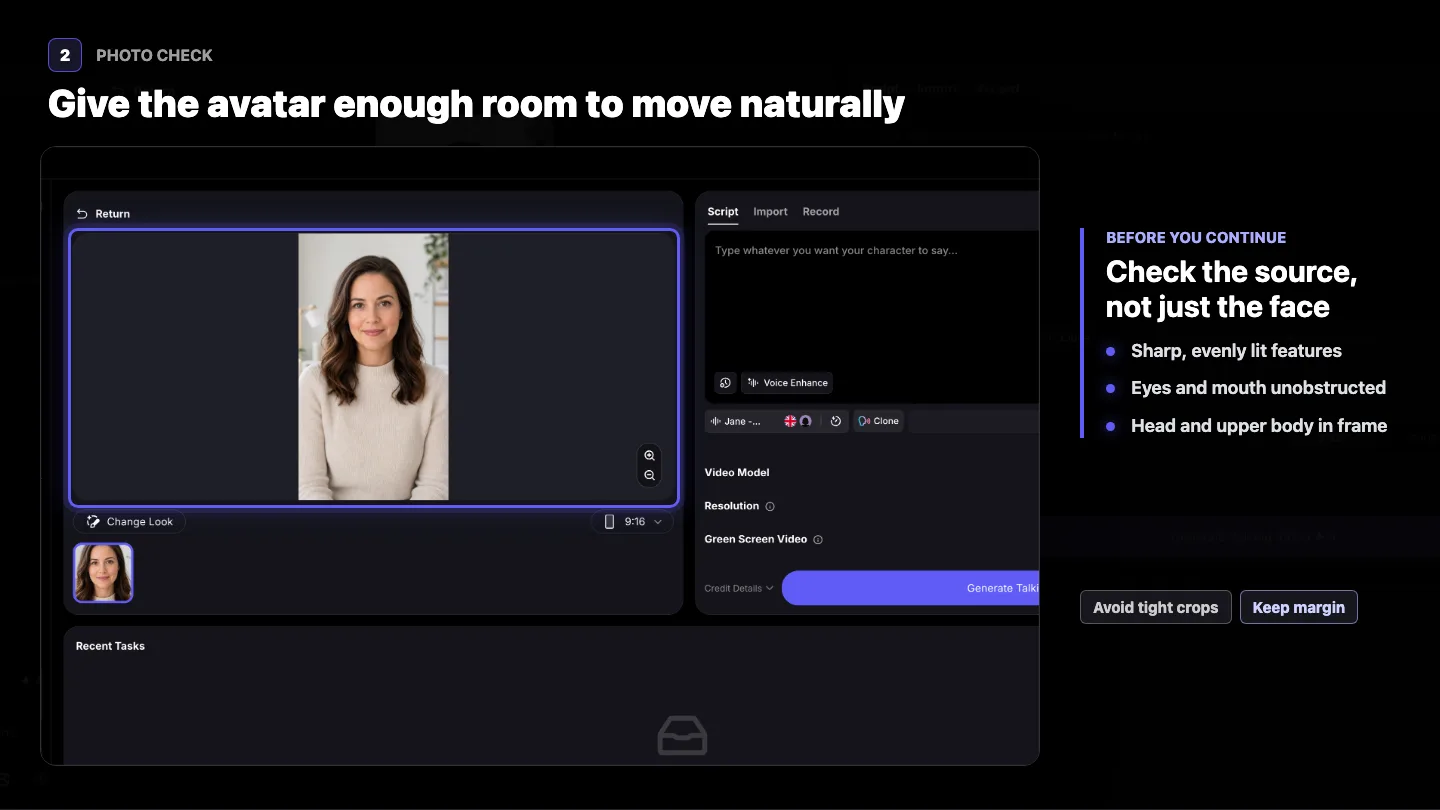
When processing finishes, the avatar appears above the public character library and opens in the avatar preview. It is visible only to you.
Step 3: Preview or change the assigned voice
VisionStory automatically assigns a suitable starting voice based on the person's apparent age and gender. You can keep it, preview it, or swap it for another.
- Select the current voice to open the Voice Library.
- Use the play button on the right of a voice to hear a sample.
- If it does not fit, filter by Language, Gender, Age, and Use Case.
- Preview a few alternatives, then choose the voice that matches both the avatar and the purpose of the video.
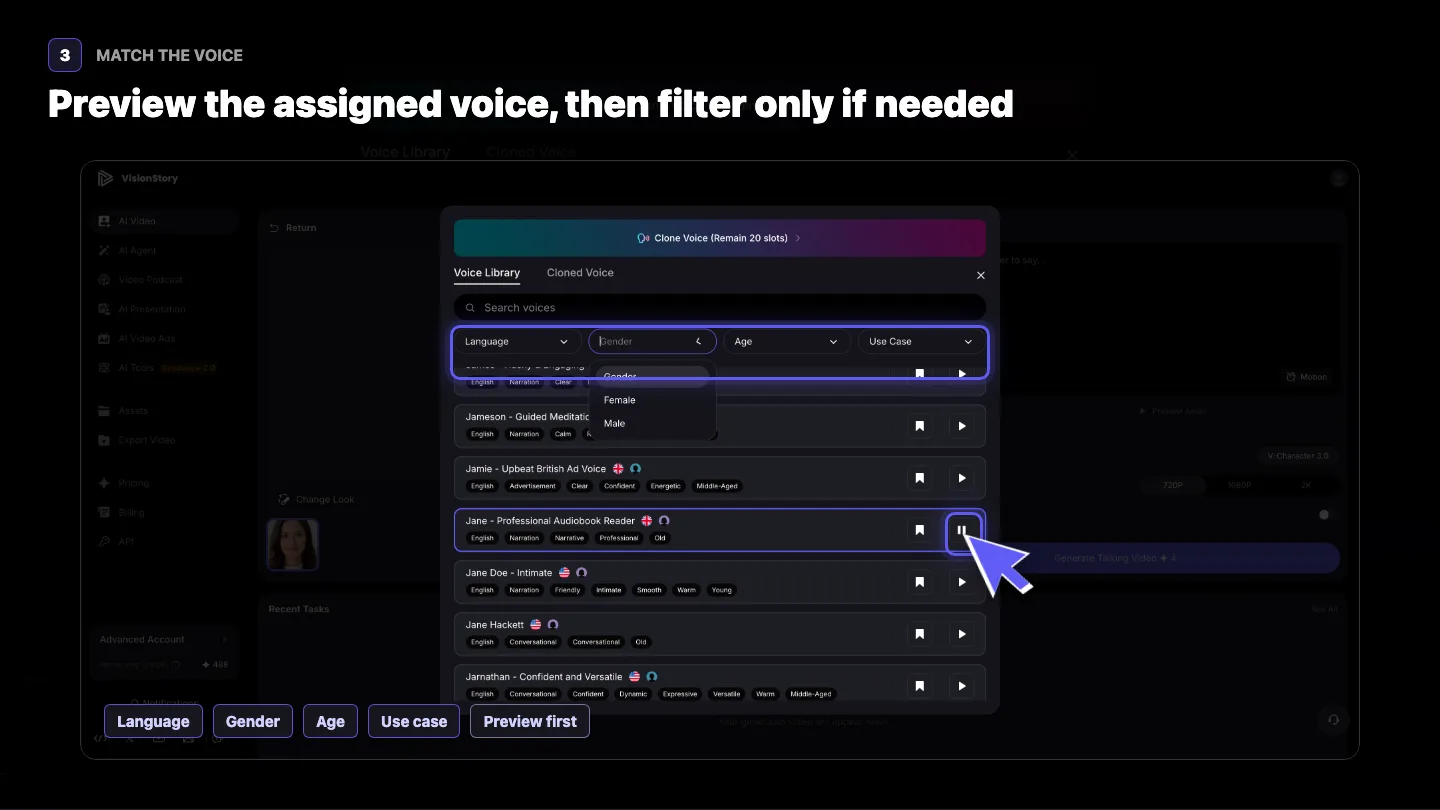
A voice can fit the person's apparent age and gender but still feel wrong for narration, education, advertising, or conversational content. Match the person and the purpose, not just the demographics.
Step 4: Reframe the photo for its destination
Use the avatar preview to decide how much of the person appears in the final video. Drag the photo to reposition the subject, and use the zoom controls to move closer or farther away. Then choose the aspect ratio that fits where you will publish:
- 9:16 portrait for TikTok, Instagram Reels, YouTube Shorts, and other mobile-first placements.
- 1:1 square for square social posts, profile-led layouts, and flexible embeds.
- 16:9 landscape for YouTube, presentations, websites, and widescreen courses.
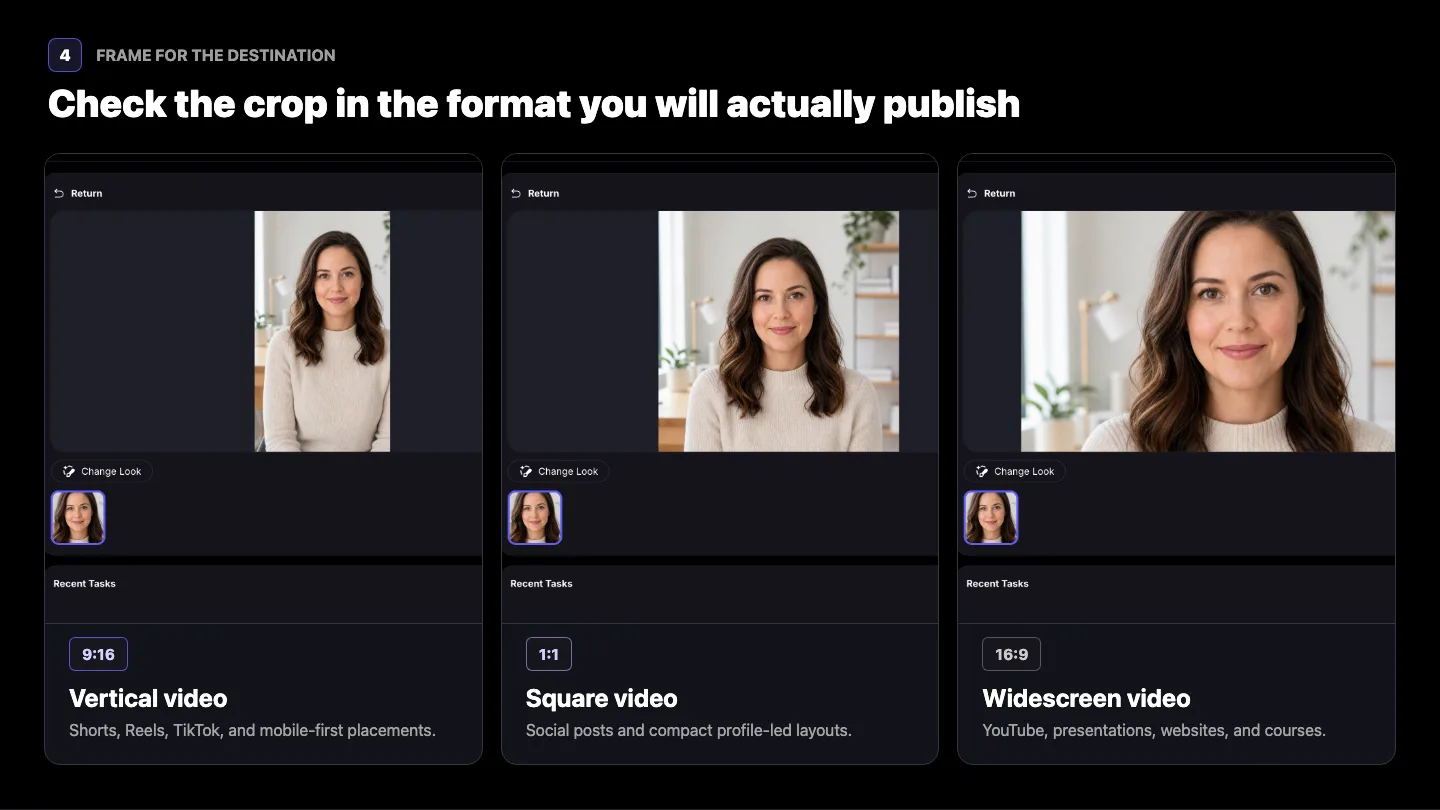
Zoom cannot reveal pixels that do not exist. If the person already touches every edge of the source photo, start from an image with more background rather than forcing a wider crop.
Step 5: Know what Change Look and Generate Image do
Two AI image tools sit next to the avatar, and it helps to know the difference before you use them.
Change Look opens an AI chat with your current avatar already attached, so you can describe a new outfit, setting, or style. It is an image-to-image workflow, and the original avatar stays available. Generate Image starts from a written character description instead of a photo, so it is a text-to-image workflow. In both, you can keep chatting to refine the result.
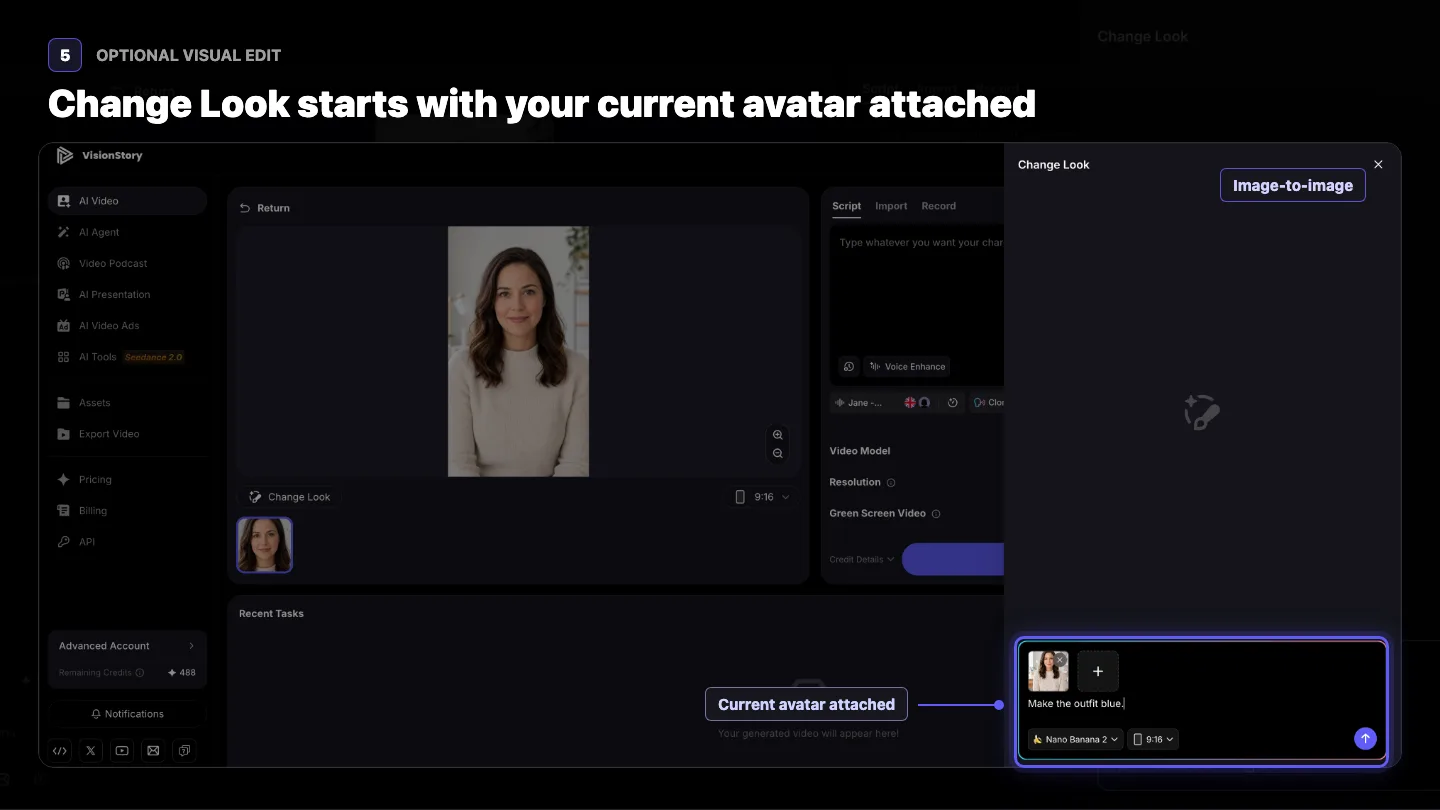
In short: use Change Look when the character already exists and needs a new visual treatment, and use Generate Image when you want to create a character from a prompt.
Step 6: Add a short script and generate the talking video
With your uploaded avatar selected, type one short, conversational sentence in the Script box. A short line renders faster and makes it easier to judge the photo, crop, voice, lip-sync, and motion together.
Click Generate Talking Video. VisionStory animates the face, syncs the lips to the voice, and adds lifelike blinks and head motion using the selected avatar, framing, script, and voice. Rendering takes a couple of minutes.
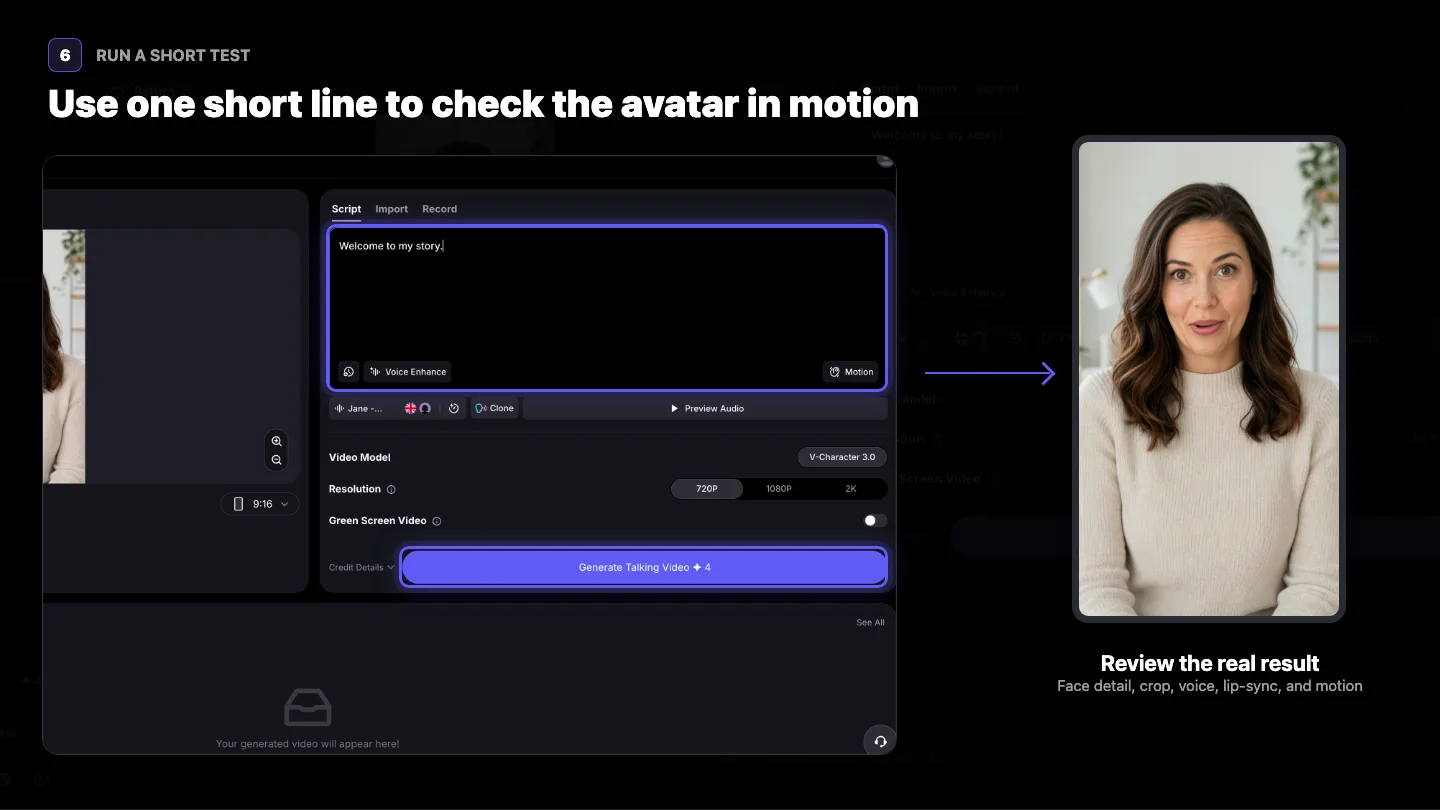
Treat this first result as a practical source-photo test. Review it for four things:
- The face stays sharp enough at the final size.
- The eyes and mouth stay unobstructed during motion.
- The head and shoulders sit comfortably inside the chosen ratio.
- The moving avatar still looks like the source person.
If the crop is too tight or the face looks soft in motion, fix the source image or framing first. Changing the script will not fix a composition problem.
Step 7: Reuse or remove your talking-photo avatar
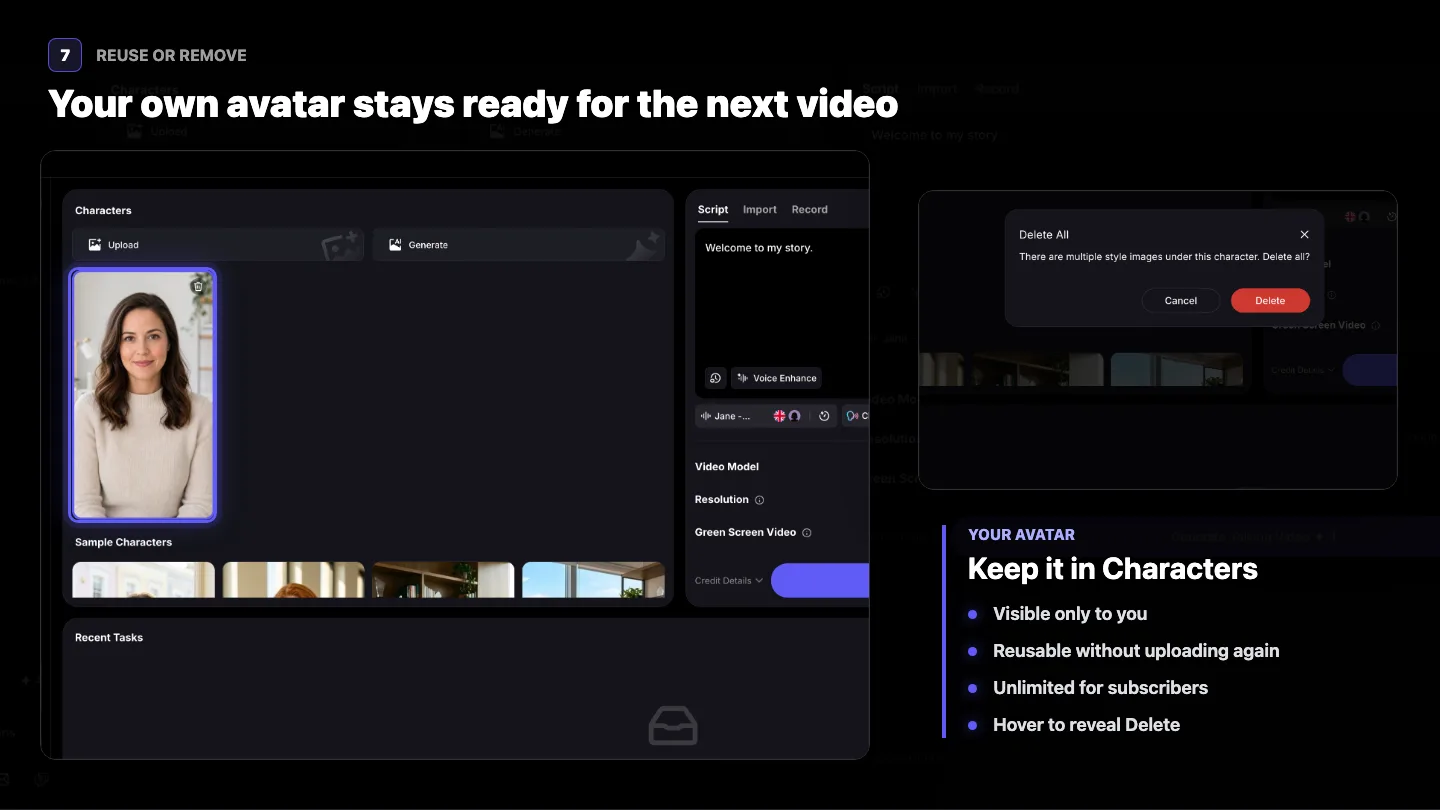
Back in the Characters list, your uploaded avatar sits above the public character library and can be selected any time you want the same presenter again. Other users cannot see it, and subscribers can create and keep unlimited avatars.
- Reuse it: select the avatar instead of uploading the photo again.
- Switch looks: open the avatar and pick one of its saved look thumbnails.
- Remove it: hover over the avatar to reveal the delete button in the top-right corner, then confirm before deleting the avatar and its looks.
Troubleshooting common photo problems
VisionStory cannot find a usable face. Use a brighter, sharper image with one larger, front-facing face. Avoid covered eyes or mouths, strong profile angles, and photos where another face sits close to the main subject.
The landscape crop is too close. The source portrait probably does not have enough image area on the sides. Use a wider source, or one with more empty space around the person.
The avatar is still preparing. Wait for preparation to finish before using the character. If it stalls, refresh the Characters view and check whether the avatar already appeared before uploading another copy.
The result looks soft. Start with a higher-resolution, in-focus photo and avoid enlarging a small face too aggressively. Output resolution cannot restore detail that was missing from the source.
That is all it takes to make a photo talk: upload one portrait, match a voice, frame it, and generate. Your photo is now a reusable talking avatar you can use again whenever you need it.
Ready for the complete script, voice, settings, credits, and generation workflow? Follow How to Create an AI Talking Avatar, or turn full scripts into AI videos at scale. Or just start now: make your first talking photo free.